Friday, December 24, 2010

Merry Christmas to you!

To all my dear friends...

Merry Christmas!!!


I pray you'll have a wonderful time

  of celebration with your family & loved ones.

May joy and happiness,

grace and blessings

fill your

homes

this season and

throughout the new year!

I am thankful and so honoured to share a little of my passion for cardmaking with you. I hope you have been inspired.  Thank you for often taking time to visit my blog. I truly appreciate it. 
 Have a wonderful day!

Hugs
Kary

Tuesday, December 21, 2010

A Weekend in Bangkok

No cards today, as I have been away on a short trip to Bangkok.  It was a wonderful trip, and I got to eat lots, shop, eat again and walked a lot.  Bangkok city was as busy as ever, and wonderfully decorated for Christmas.  Every night people take to the streets with their fancy cameras clicking away, and it was fun to watch each person capturing a moment to remember in the city.

So, here are some of the shots I managed... not many though.

A Christmas tree in the city centre

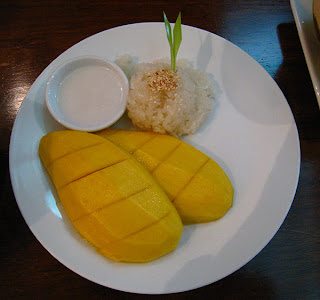
My favourite dessert - Mango & Sticky Rice

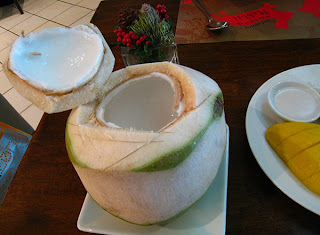
Something I have every day, Coconut!

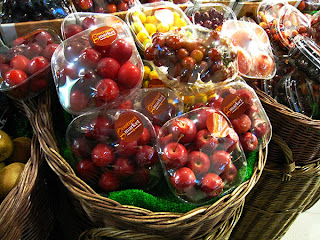
At Paragon - Gourmet Market, I have never seen mini apples before!

A Swarovski tree

The only picture of me, at the shopping mall

Trying to capture a shot of the moon

Dinner at a beautiful restaurant away from the city

Don't you think the reindeers are so cute?
I came home with some shopping (not a lot) - a pair of shoes, some clothes and of course craft supplies! (I just can't go away without buying some craft items, right?)  It was a fun trip, and so much nicer because I had a swell time with my friends.

Tuesday, December 14, 2010

Happy Wednesday...

It seems like the weeks leading up to Christmas are always busy.  I feel I haven't done much and it's like I'm running behind time in everything.  Some cards are not mailed yet, all the plans I have in mind are not done yet... but, one thing I had a little time for is making cards ;-)

So, here are the cards:

My new stamp set arrived in the mailbox, and I just had to make a card with it.  I followed the sketch at StampTV - this is an easy sketch.  The cardbase is a window card and I just cut a piece of white cardstock to size (to fit behind the oval frame), adhered the red cardstock and inserted it behind the oval window with the corners as shown. The mug was stamped on Teresa Collins paper and the mini cupcakes were coloured with copics.

This is a perfect card to make when in a hurry. Just insert a lovely patterned paper (Pink Paislee Father Christmas) onto the window cardbase, and stamp the greeting, and the card is done.

I hope your week is going well. Take care!

First card
Stamps : GKD Mugs & Kisses
Window card : Purchased in Amsterdam, can't recall the brand
Papers : White & Red cardstock, Teresa Collins
Ink : Memento & copic markers

Second card
Stamps : Hero Arts
Window card : Purchased in Amsterdam, can't recall the brand
Papers : Pink Paislee Father Christmas 6x6 pad
Ink : Memento


Friday, December 10, 2010

Cards Inspiration Friday

So glad it's Friday again!  This week has gone by so quickly.  My father is so excited today because he knows my brother is coming home tonight after a month in UK.  I'm sure he's coming back with lots of goodies - my mum is looking forward to sugar free chocolates, and I'm of course looking forward to the new Nigella Lawson cookbook bro is bringing back for me plus a few of the Waltzing Mouse stamps!  So glad!  And I still have not mailed out the Christmas cards... so disorganised :(  That's how the month has been...

Amidst all the crazy schedules, I managed to squeeze in time to create some cards.  My two boxes of craft goodies also arrived this week, so I've been wanting to use my new papers and tools but perhaps this weekend, there might be time.

Here are the cards:

I love the Pink Paislee Father Christmas 6x6 papers, they are so pretty. I just added the Lovely Labels 2 frame and a sentiment to the card.  This is a gatefold card.

 
 This card was made for the sketch challenge at StampTV.  I wanted to make a glittery card, used stickles and glitter pen but the glitter doesn't show up much on the photo.

This card was for a colour challenge at StampTV.  I embossed the card with Cuttlebug Embossing Folder Victorian.  The roses image was coloured with copic markers (R81, R83, R85, YG01, Y000, YG91), I kept the leaves and stem really light so that the focus is on the flowers.

 This card was the Unity Hip Hop sketch challenge this week at Splitcoaststampers.  It's a simple card with just layers of patterned papers and lace and some ribbon. The stamped image on watercolour paper was coloured with Twinkling H2O.

I hope these cards cheer your day.  Have a good one!

Stamps : GKD Lovely Labels 2, GKD Blessed is the Season, GKD Buds and Vases, Unity Spring Unity
Papers : Pink Paislee Father Christmas, October Afternoon Farm Fresh, GKD Cardstocks
Inks : Memento, Versafine, Copic markers, Twinkling H2O
Others : Fiskars Scallop Border punch, Spellbinders Labels 16 & Scalloped Ovals & Big Scalloped Ovals

Wednesday, December 8, 2010

Unity Addicts Challenge #30

Hello again.  Today I'm a guest for Unity Addicts Challenge #30 at Splitcoaststampers, and the challenge is to make tags.  Here's my tag:

I love making tags for Christmas especially.  Today's tag is made using Kraft cardstock, with stamping using two of my favourite Christmas stamps from Unity (see below) and a pretty patterned paper from Pink Paislee. 

First, cut the tag using Spellbinders Labels 4, I used the largest die.  Distress the edges with Distress Ink Antique Linen.  Add some stickles around the edge of the tag.  Leave to dry.  Then stamp the snowflake scalloped stamp (from Snowflakes Fall From Heaven set) randomly with Versamark on the tag.  Ink up one of the cute trees from the stamp set Peace.Love.Joy with waterbased markers, and spritz some ink blending solution so that the colours blend and stamp on the tag.  Next, stamp the Christmas definition stamp onto a cream cardstock.  Cut out the cardstock to fit the bottom of the tag & adhere with foam adhesive.  Use a fancy edged scissors to cut the Santa image from the patterned paper and adhere to the tag with foam adhesive. Tie a red gingham ribbon around tag and adhere a chipboard button on the bow as shown.  Add some blings on the tree.  Punch a hole at the top and add some jute twine and the tag is done!

I've made another tag just for fun.

This one was made with a stamp from All Worth It stamp set and the ornament is from Bright & Merry Winter Wishes.

I hope you play along with the challenge and you could win a prize. ;)

First Tag
Stamps : Unity/Jillibean Snowflakes Fall From Heaven, Unity Peace.Love.Joy
Paper : Kraft cardstock, Cream cardstock, Pink Paislee Father Christmas 6x6 pad
Inks : Versamark, Memento Markers, Tsukineko Ink Potion No. 9, Distress Ink Antique Linen
Others : Jute twine, Red & Green twine, Red Gingham ribbon, Making Memories chipboard button, Imaginisce i-rock crystals, Stickles (Burgundy), Fiskars Paper Edgers (Stamp)

Second Tag
Stamps : Unity/Melody Ross All Worth It, Unity Bright & Merry Winter Wishes, Unity/Jillibean Snowflakes Fall From Heaven
Inks : Distress Inks Antique Linen, Stormy Sky, Broken China, Memento Tuxedo Black, Copic markers
Others : Jute twine, button, brad, blings, Scor-buddy

Tuesday, December 7, 2010

Digital Stamp - Anya

Not long ago I downloaded a digital stamp from The Greeting Farm, called Cupcake Anya.  I've never owned any of TGF's stamps but I saw Anya, and gosh I think she is so adorable.  Not wanting to be a fan of too many stamp companies (otherwise, I'd be broke ;)), I decided perhaps digital is the way to go if there's an image I really like.

Here's a card I made with Cupcake Anya:


I haven't decided on a sentiment yet.  Perhaps I'll add one when I'm about to give the card away. 

The card sketch was from Card Patterns's Sketch 93.  If you are a fan of card sketches, come play along with this week's sketch.  I think it's a very nice one.

I'm off to watch Narnia, Voyage of the Dawn Treader shortly.  And yes, I'm a fan of Narnia and will have to read the book again soon...

Enjoy your day!

Stamps : The Greeting Farm - Cupcake Anya (digital download)
Papers : October Afternoon, K&Co
Ink : Copic markers (sorry, I forgot what I used)
Others : Spellbinders Labels 1, EK Success Dotted Lace punch (I've been using this a lot, right?), white gel pen, gingham pink ribbon

Monday, December 6, 2010

You've Got Mail

I really love the Pure Innocence stamps from My Favorite Things.  I think I've said this sooo many times.  I don't know what it is, but the stamps are just so cute!!
Here's a card I made today, using the set Happy Mail:


If you love colouring, then this stamp set is perfect!  I'm still practising using copic markers, so you probably can tell I don't have the right skin tone colours yet, but this will have to do for now.  For the clouds, I die-cut them using the MFT Cloud Trio Die-namics on a separate cardstock, then used them as templates to draw the clouds behind the girl image. Then I coloured the sky around the clouds with my copic marker (BG000).  I also wanted to break out my new Cosmo Cricket Circa 1934 6x6 pad.  I love this collection!  I think it's my all-time favourite Cosmo Cricket papers.

I hope you like the card.  As always, I do appreciate your thoughts.

Have a good week!

Stamps : MFT Happy Mail
Ink : Memento Tuxedo Black, Copic markers
Papers : Cosmo Cricket Circa 1934, red & lemon cardstock
Others : Organza ribbon, EK Success Dotted Lace Border punch, Sakura white gel pen, MFT Clouds Trio Die-namics

Saturday, December 4, 2010

A Bunch of Cards

Hi. Today I thought it might be nice to post some cards I made for challenges which I've not posted on my blog before.  They are made with some of my favourite Unity stamps.  There's a card for every season and I've enjoyed creating them.


A sketch challenge
For this card, I used Graphic 45's tag & papers, with a sentiment stamp.  This is a really quick way to whip up Christmas cards.
This card was for a challenge where I used black and white with  a burst of colour.  The card is almost like a gatefold card with the top flap held closed by the embossed hearts.

This was a challenge where I had to create a card & envelope set.  I used scor-buddy to create some texture on the cardbase.

This was a really simple Christmas card with just one stamped image and embossed with White embossing powder.

This challenge was to make a card with a handmade flower.  I cut a strip of paper measuring 1 1/4" and used Fiskars Apron Lace border punch along one edge of the paper.  Scored the strip (every 1/2") and make accordian folds and adhere both ends of the paper strip together. Added a button to finish up the flower.  I love the sentiment by Mother Teresa.

This last card is a shaker card.  I placed the stamped image inside the shaker, just for some fun.  It's a fun card to make.

I hope these will inspire you to create this weekend.

Have a good one!

Thursday, December 2, 2010

Emmanuel - God With Us

Earlier this week, I received a lovely gift from my friend, Christine.  She made me a felt gingerbread man which is so, SO Cute!!  And, with the gingerbread man is a beautiful poem she composed.  I thought it would be lovely to share this in today's post, and Christine said I could ;) 

Here's the poem:

              Emmanuel - God With Us
                      (composed by Christine Ang)

      In a humble manger the child King laid
 Shepherds found Him, just like the angels said
         Three wise men traveled from afar
  To offer gifts by following a shining star. 

       To all, God brings a message of hope
And to those who find life too difficult to cope
     You may seem alone on life's rough road
   But God is there to carry your heavy load. 

           Though silent He may be to you
    His abiding presence will see you through
      In His loving arms you will find refuge
    A safe haven when storms of life deluge. 

    With His hands, He wipes away your tears
   With His comfort, He allays all your fears
    Or through the valley of sorrow and pain
   God's love is there to uphold and sustain.

       He is faithful, always by your side
      And in your heart, He wants to reside
   He came to seek the lost, not worldly fame
  Emmanuel - God with us is His blessed Name.
                      ************
Such a lovely poem, so appropriate as we prepare for Christmas this December.

I've also made some really quick and easy cards using the Making Memories card pad & some stamps.  Here are some of the cards, and you can see the super cute gingerbread man Christine made amongst the cards..


I hope your hearts are encouraged today by Christine's poem.  Have a lovely day!

Stamps : Unity Bright & Merry Winter Wishes, Unity Snow Wonderful, Unity Snowflakes Fall From Heaven, Unity Peace Joy Love, GKD A Year of Borders, Hero Arts sentiment
Paper : Making Memories Noel Card pad
Inks : Copic Markers, Memento Tuxedo Black, Versamagic, Distress Inks
Others : Making Memories Poinsettia Notes, MS Vintage Lace punch, MS Frond punch

Tuesday, November 30, 2010

Season's Greetings

It's been a long while since I got my Waltzing Mouse stamps, and I haven't had time to ink them up!  And, there's the Graphic 45 Christmas Past paper pad sitting near my desk still waiting to be used.  And (gosh!)...there's actually more than one Christmas paper pads, LOL!  Sometimes I think I don't have enough Christmas papers and I'd buy some, then realised oops Christmas is almost around the corner and I don't have enough time to make all that I wanted to.. ;) Get to work, girl!!

Here's one of the cards I made:


The card was made based on Waltzing Mouse (WM)'s sketch #25.  The card measures 4 1/4" x 4 1/4", using WM Vintage Labels 1 stamp,with Spellbinders Label 1 die for the focal image with a tag from Graphic 45's Christmas Past.  Really fast and easy one.

I'll post more cards over the next few days.

Have a Lovely day!

Stamps : Waltzing Mouse Vintage Labels 1, Hero Arts (sentiment, I forgot the name of the set)
Paper : Red cardstock, Cosmo Cricket Mitten Weather, Graphic 45 Christmas Past
Ink : Versamark
Others : White embossing powder, Epoxy button (Little Yellow Bicycle), Jute twine, PTI Twill ribbon, Spellbinders Labels 1, Sakura White gel pen.

Monday, November 29, 2010

A Note of Encouragement

A friend of mine asked if I could make a card for her brother, who needs some encouragement.  She saw an earlier card of mine with a sentiment she thought would be perfect. 

So, here's take two with the same sentiment stamp...


I'm also playing along with Stampin' Sisters in Christ's Challenge #67.  How true that life is often filled with so many challenges.  In the past week, I've heard sad news of friends' loved ones with cancer, passing away, etc.  My father has been having not-so-good days too, and often when he has days like such, we will pray with him, encourage and reassure him that God cares for him.  Despite his condition (Alzheimers) he finds this comforting.  I'm also learning to understand him, and to seek for wisdom in caring for him.  Even meal times can be trying, but I guess I'm learning to just love him as he is.  There's always something good in all the difficulties/challenges we face.

May you experience God's grace today. Thanks for visiting ;)

Stamps : Unity KOM Aug 09, Unity Birdie Duet
Paper : BasicGrey Kioshi, Making Memories Ledger paper
Ink : Memento Tuxedo Black, Versafine Vintage Sepia, Distress Ink Tea Dye & Vintage Photo
Copics : Ground :YG91, YG95, YG97; Flower: YG05, V04, RV00, RV29 Sun: Y02, Y11, Y15; Bird: YG01, BG000, BG02; Sky: BG0000; Outline: E37
Others : Sakura white gel pen, jute twine, Spellbinders Labels 8

Sunday, November 28, 2010

A Year of Borders - Final day!

Time really flies when you are having a great time, and I've had so much fun creating with Melanie's "A Year of Borders".  The more I use the stamps, the more I see new possibilities - I'm sure you can tell how much I've enjoyed the set. 

I want to take this opportunity to thank all of you who have posted such encouraging and lovely comments on Melanie's blog for me as well as visiting my blog.  I sincerely appreciate it & I hope you have been inspired too.

Here's my last project as Melanie's Guest Designer. It's a masculine gift box with a clear window panel. 

I know some of us may find it challenging creating a card or project for a guy; finding the right colours & designs may not always be easy.  I love playing a 'think out-of-the-box' challenge on my own when I have a little more time to create.  I guess I sort of miss that part of my job, but wait... I can apply the same principle to stamping!   So, for this project, I thought I'd try to create something masculine with "A Year of Borders" using a feminine paper collection. Here, I've used the patterned paper from BasicGrey Kioshi and a neutral ledger paper from Making Memories with A Year of Border's leaves border stamp.

Here's a photo of the empty box (you can see the floral pattern on the inside of the box), and a close-up photo of the pinwheel:


To make the pinwheel, cut a 2"x2" piece from the ledger paper and stamp both sides (at an angle) with the Leaves border stamp.  Then, cut along the lines as shown on Diagram A below and punch tiny holes as indicated on the diagram.  Take care when you punch the holes that you don't tear the paper.  I used a 1/16" hole punch.  Then use a pencil and roll the edges of the paper where the punched holes are.  This makes it easier to bend the paper towards the centre.  Secure the pinwheel with a brad.  I used a green brad coloured with brown copic marker (E29), and left it looking a bit distressed.

Diagram A
Next, stamp the leaves borders on a white cardstock several times.  Then fold the cardstock and run it through a crimper diagonally. Cut the crimped paper into leaf shapes, you will need 4 pieces. Sponge some Distress Inks Shabby Shutters and Antique Linen on the leaves.  Add them to the pinwheel using some scor-tape and the pinwheel is done.

The box was made using half a sheet of 12"x12" paper, and measures 3 1/2" x 4 1/2" x 1 1/4".  You can use any of your favourite box templates, and use Spellbinders Labels 4 die (or any of your favourite dies) to cut out a shape in the centre of the top/front panel of your box.  Then adhere a piece of acetate (with Glossy Accents) behind that panel and the window of your box is done.  I also made a tag from the ledger paper with a smaller Labels 4 die, added a strip of the patterned paper and tied it the pinwheel with Baker's twine.

I hope you'll try this project.  I think the box would be perfect to hold some chocolates, or a little something for a guy.

Thank you, Melanie, for having me be your Guest Designer for this versatile stamp set A Year of Borders.  I am so thrilled to get to know you, and so honoured that you had faith in me.  I know I will be looking forward (eagerly!) to more wonderful stamp sets from you.  God bless!

Thank you for visiting me, and have a Blessed day!

Saturday, November 27, 2010

Poinsettia Box

It's the weekend again...so glad!  I hope you'll have some time to be creative this weekend.  As for me, I'm trying to finish up Christmas cards as I'm running behind.  It's funny, I say that every year.

Today, I'm posting the instructions for Poinsettia Box which was posted on Melanie's blog a few days ago.  I had a lot of fun making the box, and I hope you will try it.  The box can be used to store little goodies as a Christmas gift or to store 3"x3" notecards, like what I did in the picture below.


Click here to download the instructions.

I'm still learning how to attach documents for download.  Just for your info, I've also fixed the link on the previous instructions on the Recessed Windows Butterflies card too, so now, you can download the instructions.

Ok, that's it from me.  Be on the lookout for my last week with Melanie using "A Year of Borders" coming up on Sunday.

Have a wonderful weekend!!

Stamps : GKD A Year of Borders, GKD Masculine Messages (sentiment on cards)
Papers : Imaginisce & cardstock
Inks : Memento Tuxedo Black, Copics (R39, R24, R27, YG17, YG97, E33, E35)
Others : i-rock crystals, EK Success Dotted Lace Border Punch, Sakura Pigma Micron sepia 05

Wednesday, November 24, 2010

A Year of Borders - Week 3

Happy Wednesday! I hope your week is going well.  I'm glad to be sharing another idea using "A Year of Borders" by Melanie Muenchinger.  It's a tag card featuring the shells border stamp.

Here's the card:


This tag is inspired by Gina's video Scalloped Oval Card.  The card (using GKD Ivory cardstock) measures 4" in diameter, and is cut using the Spellbinders Big Scalloped Circles - the largest circle die.  Cut 2 pieces and on one of the pieces, score along 1/2" from the top. Adhere the 2 pieces together at the top until the scored line on the back piece.  Watch Gina's video to help assemble the card.

The smaller scalloped circle in the centre is cut using Spellbinders Classic Scalloped Circle Large, the 2nd smallest die, and sponged lightly with Distress Ink Tea Dye and placed in the centre of the card with foam adhesive.  Stamp the shells border on a white cardstock 3 times with Memento London Fog.  Colour with copic markers E0000, E00 and E02. Trim all the shells, and arrange them around the outer edge of the scalloped cut-out shape and adhere with foam adhesive.  Stamp the shell from Melanie's stamp set "Gifts from the Sea" using Memento Tuxedo Black and colour with the same copic markers. Cut out the shell and adhere on the smaller circle with foam adhesive as shown.  Add dash lines all around the tag and the inner circle as shown.  Punch a small hole (1/16") at the top of the card and string a strand of bakers twine.  Add a small bow to finish up the card. 

I hope you like the card and will try this idea.

Have a great day and Happy Thanksgiving to all friends in the US!

Stamps : GKD A Year of Borders, GKD Gifts from the Sea
Cardstock : GKD PLC Ivory & White
Inks : Memento Tuxedo Black & London Fog, Distress Ink Tea Dye
Copics : E0000, E00, E02
Others : Spellbinders Big Scalloped Circles, Classic Scalloped Circle Large, Sakura Pigma Micron Sepia

Saturday, November 20, 2010

Butterflies Recessed Window Card

Weekend is here, and I finally finished the instructions for the Butterflies Recessed Window card which was recently published on Melanie's blog.  To tell you the truth, I had thought of making a video on how to make the card, but I've never recorded myself before, and would need a lot more time to learn and edit.  So, for this time, I'll just do a written instruction.

Here's the card :


A closer view
So, here's my instruction
I hope you will try to make this card.

Have a lovely weekend!

Friday, November 19, 2010

Lollipop Girl

Today's card has one of my favourite "My Favourite Things" Pure Innocence stamps.  I love the lollipop the little girl is holding and I wanted to make it really colourful.  After I was done colouring the entire image, I had quite a bit of problem deciding how to finish up the card.  Spent some time rummaging through all my cardstock, before I found a perfect one for the image.  Here's the finished card:

On the cardbase, I embossed the centre using a Cuttlebug embossing folder Morrocan Screen.  The polka dot patterned paper is from October Afternoon, and I used my Fiskars scalloped border punch and adhered it to the card.  The cream ledger paper is from Making Memories.

Enjoy your day!

Stamps : MFT Pure Innocence Lollipop Girl
Ink : Memento Tuxedo Black
Patterned papers : October Afternoon Ducks in a Row, Making Memories
Others : Spellbinders Petite Ovals & Petite Scalloped Ovals, White gel pen, Copic markers

Thursday, November 18, 2010

StampTV Sketch Challenge STVSKSP2

I had so much fun with the border stamp "A Year of Borders" that I had to make another card with it.  Today's card was inspired by the sketch at StampTV STVSKSP2.  I've added the link so you can check it out and play along if you like.

Here's the sketch:


And here's my card:

I flipped the sketch around (180 degrees).  What I did was punch both ends of a teal coloured patterned paper using Martha Stewart's  Garden Trellis punch.  Then added the floral border with foam adhesive on the lattice punch-out.  The border was slightly longer than the card, so I used the leftover trimmed piece to be placed next to the sentiment. 

This card is also dedicated to you - "Thank You" for visiting me today.

Stamps : GKD A Year of Borders, GKD Wild At Heart (sentiment)
Paper : GKD Ocean Mist cardstock
Others : Martha Stewart Garden Trellis punch, Sakura White gel pen, copic markers 

Wednesday, November 17, 2010

A Year of Borders - Week 2

Hello again.  I hope you are having a wonderful week so far.  Today, I'm sharing another card using Melanie's new stamp set "A Year of Borders".  For this card, I used one of the border stamps to coordinate with another of Melanie's gorgeous set "Buds and Vases".

Here's the card:


What I've done was to colour all the images (with copic markers), then cut them out.  I also made a frame (measuring 3.5"x 5") from black cardstock and added some faux stitching with white gel pen all around the frame and adhered it to the cardbase.  Then I arranged and adhered the border, vase and flowers onto the cardbase with foam adhesive.  Placed the sentiment at the top right hand corner (with foam adhesive).  The sentiment was cut with Spellbinders Big Scalloped Oval die and sponged with some Distress Ink (Shabby Shutters).  While I'm typing this, I'm thinking perhaps the border flowers could also be cut up and arranged around the base of the vase - that might be more interesting.  Perhaps an idea for another card?


Do let me know what you think of the card, and Have a wonderful day!

Stamps : GKD A Year of Borders, GKD Buds and Vases
Copics : Flowers : R81, R83, R85 ; Leaves : YG01, YG3, YG17

Tuesday, November 16, 2010

Card Patterns Sketch #90

It's been a long while since I played at Card Patterns, but since I've been busy making Christmas cards I thought why not try one with the challenge sketch.

Here's the card:

Decided to use very simple stamping with different inks and arranged them as per the sketch. The inchies are cut outs from stamped images and mounted on foam adhesives.  Then, added faux stitches with white gel pen all around the card and the strips of red cardstock (seems to be my favourite thing to do;)).

Enjoy the rest of your day!

Stamps : GKD Vintage Borders, GKD Blessed is the Season, GKD Fanciful Tags (sentiment)
Paper : GKD PL cardstock Fresh Asparagus, scraps of red cardstock and patterned paper.
Inks : Versamagic Tea Leaves & Red Magic, Versafine Onyx Black, Colorbox Frost White

Monday, November 15, 2010

Birthday Card

Happy Monday!  Today, I'm sharing a Birthday Card.  I played along with StampTV's colour challenge, using the colours Turquoise, Red and White.  I seem to have friends & family whose birthdays fall on the first half of the year.  In order to be a little organised, I should make a few birthday cards to stock up.

Here's the card:


I couldn't find a suitable turquoise card or paper, so I had to use ink and ribbon to help.  Firstly, I cut the white cardstock (4x5.25") and embossed it with the Cuttlebug embossing folder.  Then inked the embossed image with Versamagic Sea Breeze which is a lovely turquoise chalk ink.  Stamped the candles with the same ink and mat them onto red cardstock, and adhered to the card using foam squares.

This card is going to a friend of mine.  I hope she will like it ;)

Stamps : GKD Candles on your cake
Inks : Versamagic Sea Breeze & Red Magic
Others : Cuttlebug Embossing folder (Number Collage)

Friday, November 12, 2010

A Christmas Card

I cannot resist showing you another Christmas card today with the "A Year of Borders" stamp set.  You've seen the card at Melanie's blog, and this one is very similar. 

Here's the card seen at Melanie's blog:


And this is today's card:


On this card, the cardbase is embossed with Cuttlebug Embossing folder Snowflake as well as the snowflake patterned paper.  Adhere the patterned paper to the cardbase, lining up the embossed image so they match perfectly.  Cut a slit about 3/4" above the bottom edge of the card and string the gold ribbon and tie as shown in the photo.  Adhere the poinsettia border above the ribbon.  Adhere the sentiment to the cut out tag (with Spellbinder's Fancy Tags) and place it with foam adhesive onto the card as shown.  Place a cut out poinsettia at the side of the sentiment.  To finish off the card, add some faux stitches along the border of the card with Memento Marker.

I hope you like the card.  Have a wonderful weekend!

Stamps : GKD A Year of Borders, GKD Fanciful Tags (sentiment)
Cardstock : GKD PLC White, patterned papers
Others : Spellbinders Fancy Tags, Memento Marker New Sprout, copic markers

Wednesday, November 10, 2010

Guest Designer for Melanie's "A Year of Borders"

I can't tell you how Suprised and Excited I was to hear from Melanie Muenchinger asking me if I would like to be her Guest Designer for her new stamp set "A Year of Borders"!  I am a BIG fan of Melanie's eversince I discovered StampTV!!  I love her stamp sets because they are so gorgeous and so versatile - it's so easy to create great looking cards with them. 

At the same time, I feel a little nervous as I've never done anything like this before.  I classify myself a "laid back" stamper, just happy to be stamping for fun.  Nevertheless, I hope to be able to share some of my ideas and hopefully you will be inspired.

"A Year of Borders" is a great stamp set - it's one I know I will be using regularly throughout the year.  Even though it's a border set, but when using it, think beyond just borders.  The images can be cut out and used in many ways, just let your creativity take over.

Here's my card:


I love the autumn leaves and acorn border!  Since we don't celebrate Thanksgiving in Malaysia nor have autumn (weather is hot all year round) I decided to use it with the Gina K Friends sentiment set.  The sentiment describes thankfulness for friends who have been with us through every season of life, the good and the not-so-smooth journeys.


A closer view
 I hope you like the card and I hope it will inspire you to use "A Year of Borders" to create something today.

Thank you, Melanie, for allowing me to share ideas with your beautiful stamp set.  I feel so honoured!

Have a blessed day!

Stamps : GKD A Year of Borders, GKD Friends
Papers : GKD PLC Tan, Graphic 45 Christmas Past
Others : Spellbinders Labels 14, Sakura Pigma Micron Sepia 01
Copics : E0000, E04, E11, E31, E35, E37, W3, YR04, YG03, Y11