Sunday, January 28, 2018

You Are...


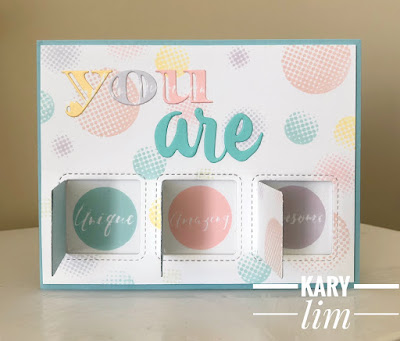
 I usually make scene cards for little guys with some cute puns but today I thought I would try a different style.

The products I used are Altenew's Halftone Circles and Circled Sentiments stamp sets with the Inline Alpha and Calligraphy Alpha die sets.

Halftone Circles Stamp Set - Altenew

2b21ccac-7cad-4f3b-8ff8-8651b5734ced

Inline Alpha Die Set - Altenew

Calligraphy Alpha Die Set - Altenew

The inks I used are the lightest shades of Altenew Inkpads - Buttercream, Frayed Leaf, Soft Lilac, Frosty Pink, Blush, Artic and Sea Glass.

First, on a white piece of cardstock cut slightly smaller than 4.25 x 5.5 I stamped the 4 smallest halftone circles in the soft ink shades.  Then I die-cut the peek-a-boo windows towards the bottom as shown. I also die-cut the peek-a-boo windows from a blue cardstock and cut the window panels out and adhered them to the inner side of the window.  This will give the interactive windows some additional dimension and strength.

Next, I selected 3 of the Circled Sentiments (Unique, Amazing and Awesome) and stamped them on another white cardstock - leaving enough space between each sentiment as these will be adhered to the cardbase behind the peek-a-boo windows. I measured the windows, mark them on the cardbase with a pencil and carefully adhered the Circled Sentiments on the cardbase.  Then I adhered the stamped cardstock onto the cardbase with foam adhesive for some dimension.


Next, I stamped the Circle sentiments once more on a scrap white cardstock with Buttercream, Artic and Frosty Pink inks and die-cut the letters 'YOU' with the Inline Alpha dies. Then I die-cut the word 'ARE' from a teal cardstock using the Calligraphy Alpha dies.  The words are adhered to the card as shown.


I think this interactive card is rather fun for a young boy.

Thanks so much for stopping by.

Have a great day!


Wednesday, January 17, 2018

Hello


Let it Shine!
I think I went a little overboard with this theme for my card....


The stamp set I used is Beautiful Day and its coordinating dies.

Beautiful Day Stamp Set

I stamped the outlined flower image onto Canson XL watercolour cardstock with Distress Ink Worn Lipstick.  To colour the flower, I used Marvy marker English Red, Tonic Studios Nuvo Aqua Shimmer pen and some water.  I scribbled the Red marker onto a Watercolour Palette and squeezed some drops of the Shimmer pen on it. I used a normal synthetic fibre brush to pick up the colour from the palette.  I love how shimmery the image turned out and hope you can see it from the photos.

The leaves were stamped using the Altenew Inkpads Frayed Leaf, Forest Glades and Evergreen. All the stamped images are die-cut out using the Coordinating dies.  I also added some shimmer on them using the Aqua Shimmer pen.

I also created another stamped piece using Altenew's Wood Pallet Background stamp. I used Vintage Photo Distress and Distress Oxide Inks on the stamp and stamped it on Neenah Solar White cardstock.  I added several layers of ink with the Ink blending tool - Fired Brick, Antique Linen, Iced Spruce and Vintage Photo Distress Oxide inks. Next I added some Shimmer spritz colours to give the Woodgrain image some shimmer. Then I used a square stitched die to cut out the woodgrain piece.  

To create the gold frame I added some double-sided adhesive tape around a piece of white cardstock and die-cut out the square frame.  Then I remove the adhesive tape release paper and placed a piece of gold foil over the die-cut frame.  I really love this simple technique!

To assemble the card, I adhered the gold frame with foam adhesive onto the woodgrain die-cut and adhere them to a deep pink cardbase.  Then I assembled the leaves and flower onto the woodgrain piece as shown and adhered them with foam adhesive for some added dimension.

To ground the sentiment, I adhered a thin black strip of cardstock onto the card.  The sentiment is from my all time favourite set Super Script.  I stamped the word "hello" onto a white cardstock and heat embossed it and die-cut it with the coordinating die.  The sentiment is adhered with foam adhesive onto the card.


To finish off the card, I added some sequins.

What do you think?  Too much shimmer and shine? Lol! 

Have a great day!

You are Amazing


Today I have Clean and Simple card to share.  I must admit I am not very good with Clean and Simple cards because I just want to add colours to everything.

Here's my card:


The stamp set I used is Floral Spring. I simply love it!

Floral Sprig Stamp Set - Altenew

I stamped the image towards the left side of the card and coloured it with Copic markers.  The colours I used are YG17, YG03, YG21, E37, E35, E33, E31, Y17, Y15 and Y13. To add a little interest I extended the leave colours outside the lines and used the Colourless Blender to blend the shades.  I then stamped the sentiment "You are Amazing" with Versamark and heat embossed it with an orange embossing powder.
To finish the card, I used a rectangle stitched die to cut out the stamped image and adhered it with foam adhesive onto an orange card base and added some English Mustard Nuvo Crystal Drops.

I hope you like the card.

Have a great day!

Thursday, January 11, 2018

Unity Hop {11 January 2018}

Hello Friends!

I can't believe 2018 is here. Any new year resolutions made? I guess for me it's finding a balance between work, crafting and everything that I love. I need to also put to use the craft supplies I keep buying - LOL!

So glad you are here hopping with us.  I hope you find lots of inspiration along the way.

Today's hop is special cos it's also Angela's Birthday.
Happy Birthday, Angela!!!


There are some Awesome new releases this month...


We have TWO amazing Unity filled prize packages to giveaway.  Leave a comment on EACH blog in the hop for your chance to win. 

— PRIZE WINNERS WILL BE ANNOUNCED MONDAY NIGHT ON THE UNITY BLOG —

Enjoy the hop!

Here's the hop list...


Sunday, January 7, 2018

All About Layering 2


Hello again!


For my second card, I decided to use the Winter Rose stamp set. I love how beautiful the Roses are.  I must admit it was a little daunting at first trying to figure out how to layer the roses but the guide was so helpful.

6x8_Winter_Rose.jpg
I used the Cool Summer Night inks and Memento Tuxedo Black for stamping the roses.  I didn't have the dies for this set so I fussy cut the flowers and it was easy enough to do so.  To assemble the card, I die cut the Doodled Lace Cover die with white cardstock and adhered it to the cardbase. I also added some leaves diecut from Fantasy Floral 3D die set behind the roses.  The centre rose was adhered with foam adhesive for some dimension. For the sentiment, I stamped Happy Birthday (from Birthday Greetings stamp set) on black cardstock and white heat embossed it. Then I cut it down to a thin strip and cut the fishtails at both ends of the sentiment and adhered it to the card with foam adhesive.

This is rather fun and addictive... more to come.

Have a great day!

All About Layering

Hello Friends!

Happy New Year!!


Today, I have 2 layering cards to share using Altenew Stamps from the All About Layering 1 and 2 Class at Altenew Academy.


For my first card, I used the Vintage Roses stamp and die set. I stamped the roses and the leaves on white cardstock with the help of Misti, and then die cut the images. The inks I used are Shades of Purple and Tropical Forest. 

I love using cover dies on cards and Altenew has some amazing cover dies. The one I used on this card is Shutter Cover die with white cardstock.  For some interest, I thought it would be fun to have the leaves behind the Shutter die and the Flowers above it.  I assembled the flowers on the cardbase so I know where to position the leaves and adhered the leaves first to the cardbase.  Next, I adhered the Shutter Cover die and then adhered the flowers.  The Sentiment is from Label Love set which is one of my favourites. Lastly, I added tiny pearls onto the flower centres.


I really had fun creating this card. 

Have a great day!